Cuisenaire Squares
Problem

What do you notice?
What do you wonder?
How would you describe what you see?
These patterns have been made using Cuisenaire rods.
Try recreating the picture using rods or using this interactivity:
What will the next square look like?
And the next one?
How would you describe the pattern in full?
Can you describe the pattern in a general way?
Getting Started
Alternatively, drawing rods on squared paper might help.
Student Solutions
Youssef from Newton International School West Bay in Qatar wrote:
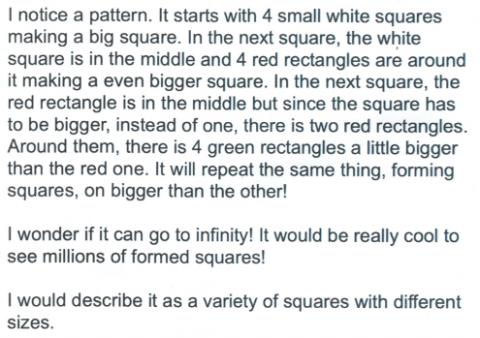
The Cuisenaire rods are all going in patterns by adding one rod in the middle or at the center and they're also going in patterns in their size. One is just bigger than the other.
Ronan from Bainbridge, Askrigg and West Burton School Federation sent in his work:
So you start by putting four white blocks next to each other. Then, put red blocks next to each other by rotating them and then put a white block in the middle. Then, put bigger green blocks in and two red blocks in the middle. Add then pink blocks and three green blocks in the middle. Add yellow blocks after and put pink blocks in the middle. You need the memorise the pattern to get it always right.
We had three pupils' work sent in from the International School of Brussels.
Nils:

Ana


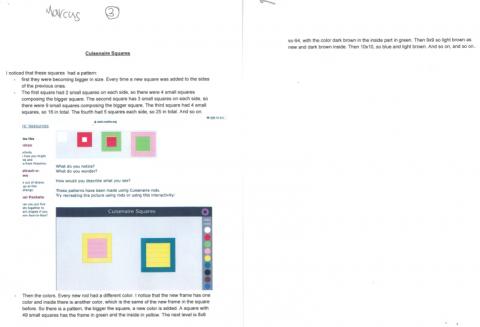
Marcus

Simran and Siddharth from West Windsor-Plainsboro Regional School District, USA, sent in their detailed work:
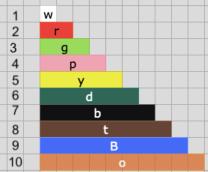
First, we noticed that if we align the rods from shortest to longest, each rod is 1 unit longer than the rod that precedes it. This made it easy to see that the squares are made from two colour rods that are next to each other on this alignment. Each figure has a boundary that is made of the bigger rod (we can also think of it as an unfilled square) and the inner filled portion is a square made of the preceding smaller rod. Together, the boundary and the inner square make a two-coloured square. If the boundary is made of pink rods, the inner square is made of the light green rod because it precedes it.

So, the next square in this series will be a square with a yellow boundary and inner square filled with pink rods. The next figure will have a dark green boundary and inner square of yellow rods.

Here are some observations about the squares.

![]()
If n denotes the rod number on the alignment, the inner square makes n x n array and the two-coloured square is (n+2) x (n+2) array. The exception is the white rods because they fit together with no inner square.
Here are some observations for the squares made with overlapping rods.


We noticed that the boundary rods are arranged like a jigsaw puzzle such that they do not overlap. We wondered if we made the boundary by creating overlaps, we could make squares that look different. The squares were smaller but interestingly, we found that (if n denotes rod number on the alignment), the inner square makes n x n array and the two-colored square is (n+2) x (n+2) array. This was the same as the previous case. In the previous case, there is no inner square when white rods are used but in this case, there is no inner square when white or red rods are used.
Well done all of you, some excellent observations!
Teachers' Resources
Why do this problem?
This problem encourages children to make conjuctures and generalisations, and it may lead into discussions about square numbers.Possible approach
Ideally, learners would have real Cuisenaire rods to use, so that they can solve this problem practically as well as virtually. If they are not already familiar with Cuisenaire rods, it is essential to give them time to 'play' before having a go at this activity.Introduce the task by showing the image. Try not to say anything by way of explanation, simply ask, "What do you notice? What do you wonder?". Give learners a few minutes of thinking time on their own before suggesting that they talk to a partner. Invite pairs to share their noticings, or wonderings, with the whole group, writing them up on the board without offering comment yourself. Encourage members of the class to respond to anything you have written. How do they know the images are all squares?
Introduce Cuisenaire, either the physical rods, or the interactivity. If you do not have real rods, it would be useful for children to have access to the interactivity in pairs, for example on a tablet or computer. Invite learners to try to recreate the picture first and then to continue the pattern. You could ask a few pairs to create the next squares in the sequence on the interactive whiteboard, or under a visualiser with real rods. Each time, encourage the class to explain how we know that the image is definitely the next one in the sequence.
Give pairs, or groups of four, a chance to articulate the general pattern and to rehearse the wording until they are happy that it is clear. As a whole class, refine the general 'rule' together. Learners might refer to the rods in the previous picture to describe what a particular image looks like. They may begin to refer to the rods using a numbered length, but that is certainly not necessary.
