Plaiting and Braiding
For thousands of years people have used different ways of plaiting and braiding fibres together to make cords for decoration, for ties on clothes, for carrying things and anything else they needed. Today, braids made by machines still have many of the same uses: trimmings for clothes and furniture and woven ropes for climbing, for example.
The instructions here tell you how to make some different braids: some simpler, some more complicated.
You can use all sorts of things to make braids. Wool is good because it is bouncy and also cheap. Wool strands in a braid tend to squash together so that you can't tell them apart unless they are different colours. String or cord can be effective if you want to be able to see where the strands of your braid go. You could also try some more exotic materials - how about wire, or long grass, or elastic from a big elastic band? Think about what you want your braid to do. Does it need to be wide or narrow? Stiff or bendy? Stretchy or not stretchy? What colour do you want it to be?
Plaiting
You've almost certainly made a plait with three strands
before, but you may not have plaited with larger numbers.
You can plait almost anything - string, wool, cord, wire - but
string or cord are easy to start with. You need to cut strands to
plait with before you start. Remember that the finished plait will
be shorter than the strands you started with.
You might want to make a finished plait into a loop, for
example to make a bracelet. To do this you can tie the ends
together, and maybe cover them by winding some more string round.
Or you can carefully weave the ends strands of one end into the
other using a large needle.
Three strands
A three-strand plait is the simplest to make.
- First, make a knot in the three strings to stop your plait coming unravelled, and fix your strings down - you could tie them to something or stick them to a surface with tape (be careful not to use a surface which will be damaged).
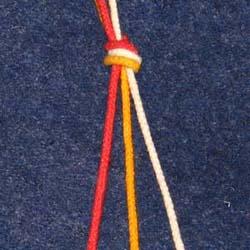
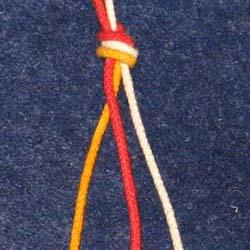
- Start the plait by moving the left-hand strand in front of its next-door neighbour to become the middle strand.
- Now move the right hand strand to become the middle one.
- Repeat steps 2 and 3 until the plait is the length you want. It helps if you keep the strands untangled below the place you are working, otherwise the plait can easily turn into a messy tangle. Finish the plait with another knot to stop it coming undone.
Image
Image
Image

Image

Remember: left to the middle then right to the middle then
left to the middle then right to the middle...
Other odd numbers
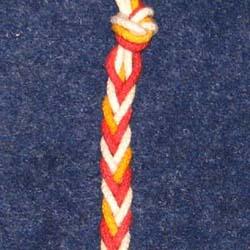
Plait with other odd numbers of strands in the same way.
- Fix down an odd number of strands.
- Move the left hand strand into the middle by crossing over the strands in between.
- Then the right.
- Then the left, then the right... until the plait is long enough. Tie a knot to finish it off.
Image

Image

Image

Image

Image

Image
Image

Image

Even numbers
With even numbers of strands there isn't a middle strand, so
you can't do exactly the same thing as you did for odd numbers. But
you can still make a plait.
- Tie a knot and fix the strands down. Divide the strands into two bunches, with the same number of strings in each bunch.
- Take the strand furthest to the left of the left hand bunch and move it to the left side of the right hand bunch.
- Then take the strand furthest to the right of the right hand bunch and move it to the right side of the left hand bunch.
- Keep going until your plait is long enough and finish by tying a knot.
Image

Image

Image

Image

Image

Image

Image

Image

Some things to think about
Does the bottom of your plait look the same after every time
you move a strand?
If not, how many moves do you have to make until it does look
the same?
Is the answer the same if you plait with strands in different
colours as it is when you plait with just one colour?
Finger Weaving
Finger weaving is a way of making narrow, flat bands suitable
for things like bracelets. You can use any number of strands, but
four is a good place to start. Wool is a good material for finger
weaving because it is soft so the strands lie nicely. Again, you'll
need to cut your strands of wool before you start.
- Tie a knot in your strands and fix them down.
- Pick up the strand on the left hand side and take it to the right hand side, weaving alternately under and over the strands you pass on the way. If you're left-handed, you might find it easier to take the right hand strand and weave it across to the left side.
- Now do the exactly the same again: pick up a strand from the same side as last time, and weave it to the other side. It doesn't matter whether you start by going under or over the first strand, as long as you do the same every time.
- Keep weaving strands from one side to the other until you've reached the length you want. Finish by tying a knot.
Image

Image

Image

Image

Image

Image

Things to think about
Can you draw your finger weaving, showing all the unders and
overs?
Some Braids
There are lots of ways to weave strands together to make
cords. Here are just some of them. String or wool are good for
these braids. You need to cut lengths of it before you start.
Image
Image
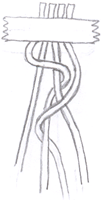
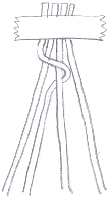
A four-strand braid
- Tie four strands together with a knot and fix them down.
- Pick up the left hand strand. Move it over the top of the two strands to its right, and then go back under the second of these two.
- Now pick up the right hand strand. Move it over the top of the two strands to its left, and then go back under the second of these two.
- Repeat steps 2 and 3 until your cord is long enough. Finish by tying a knot.
Image

Image

An eight-strand braid
This is very like the four-strand braid, with different
numbers.
- Tie eight strands together and fix them down.
- Take the left hand strand over five strands to its right, then back under the last two of these.
- Take the right hand strand and go over five strands to its left, then back under the last two.
- Keep repeating steps 2 and 3, finishing with a knot.
Image

A twelve-strand braid
Make this braid like the four and eight-stranded ones, but
taking the strands from the outside over eight strands and back
under three.
Things to think about
Can you use numbers to write down how you made each braid? For
example, positive numbers could mean you should cross over strands
and negative numbers could mean you should go under them. So "5,
-2" would mean "go over five strands then back under the last
two".
What other braids can you make?
Write down how to make one braid using your number system and
give the instructions to a friend. Can they make your braid from
the instructions?
"Fill gap" braid
This braid is a bit different. You need seven strands, and a
circular or octagonal piece of stiff card like the one in the
diagram, with eight slots round the outside and a hole in the
middle.
Image

- Thread the seven strands front-to-back through the hole in the middle of your card and tie the short ends in a knot at the back. Put each strand into a slot round the outside of the card and turn it round to put the empty slot to the top.
- Take the strand three places to the right of the empty slot out of its slit and move it into the empty slot, crossing over the threads in between. Now you have a new empty slot.
- Take the thread three places in the clockwise direction from the new empty slot and move it into the empty space.
- Keep going like this until the braid is long enough.
Image

Image

Some More things to Look at
If you're interested in braiding and weaving, Phiala's String Page is very
useful. It has information about different braids and about their
uses in history. There are also instructions for some simple kinds
of weaving beyond finger weaving, and lists of books and websites
where you can find out more.
The Braid Society
has nice pictures, and some instructions for making different
braids.
