Copyright © University of Cambridge. All rights reserved.

'Knight's Swap' printed from https://nrich.maths.org/

Show menu


Several people decided that 16 moves were needed to swap the stars and moons. The really interesting part is the ways they invented to tell us what the moves were ...
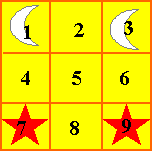
Joshua (Brooklands Primary School, Suffolk) numbered the squares 1 to 9 like this:
Solution

He says, "I could do the swap of the moons and stars in 16 moves:

  1. star at 7 goes to 6
  2. moon at 1 goes to 8
  3. star at 6 goes to 1
  4. moon at 3 goes to 4
  5. star at 9 goes to 2
  6. moon at 4 goes to 9
  7. moon at 8 goes to 3
  8. star at 2 goes to 7
  1. moon at 3 goes to 4
  2. moon at 9 goes to 2
  3. moon at 4 goes to 9
  4. star at 7 goes to 6
  5. moon at 2 goes to 7
  6. star at 1 goes to 8
  7. star at 6 goes to 1
  8. star at 8 goes to 3"

Thomas (Tattingstone School, UK) used the game-board like a map grid.
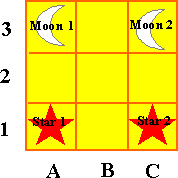
Thomas's solution.

  • Star 1 to B3
  • Star 2 to A2
  • Moon 1 to B1
  • Moon 2 to C2
  • Star 1 to C1
  • Star 2 to C3
  • Moon 1 to A3
  • Moon 2 to A1
  • Star 1 to A2
  • Star 2 to B1
  • Moon 1 to C2
  • Moon 2 to B3
  • Star 1 to C3
  • Star 2 to A3
  • Moon 1 to A1
  • Moon 2 to C1

Jaimee (Tattingstone School, UK) gave each square a letter and called the Stars S1 and S2, and the Moons M1 and M2.
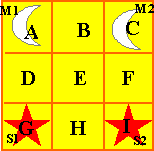
Jaimee's solution.

  • M1 to F
  • S1 to B
  • M1 to G
  • S2 to D
  • M2 to H
  • S2 to C
  • M2 to A
  • M2 to F
  • S1 to I
  • M1 to B
  • M2 to G
  • S1 to D
  • M1 to I
  • S2 to H
  • S2 to A
  • S1 to C