Copyright © University of Cambridge. All rights reserved.
Poly Plug Pattern
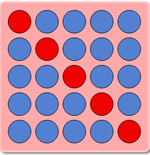
Can you create a pattern on a 5 by 5 board like the one below?
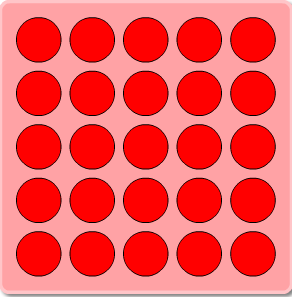
You could print off this board and use counters to create a pattern.
How could you continue the pattern on a large 25 by 25 board like this one?
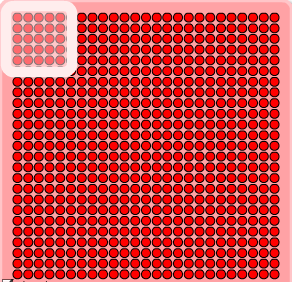
You could print off this sheet to try out your ideas.
We would love to see pictures of your 5 by 5 pattern and your extended pattern. We would also be keen to hear how you went about extending it.
This activity has been inspired by Doug Williams' Poly Plug resource. You can find out more details, including how to order sets of Poly Plug, on the Mathematics Centre website. However, you do not need sets of Poly Plug to have a go at this activity.
Why do this problem?
This task gives children the opportunity to make and describe patterns. The challenge of extending a pattern allows learners to be creative and you may observe use of symmetry, rotations, enlargements and/or translations, even if the children themselves are not yet familiar with these mathematical terms.
Possible approach
Invite children to create a pattern, either using blue and red plugs on a Poly Plug board if you have them, or using counters of two different colours on
this large 5 by 5 grid. You may like to specify the number of plugs/counters of each colour. Allow some time for learners to share what
they have done with everyone else. If using Poly Plug boards, children could hold up their patterns for all to see. If using counters, it might be easier for half the class to walk around the room looking at the patterns made by the other half and vice versa. Encourage children to comment on any patterns that they particularly liked and to give reasons. You could then give
a few minutes for everyone to change their pattern, should they wish. Sometimes learners 'up their game' once they have seen what others have produced.
Draw everyone together and project the images in the problem onto the interactive whiteboard, or invite learners to gather round your own printed 5 by 5 grid. Create a pattern yourself on the 5 by 5 grid, for example:
You may like to talk through what you're doing as you go in an attempt to communicate the pattern to the group. Then indicate the 25 by 25 grid and explain that the idea is to try to extend or continue the pattern on this grid. Invite children to talk in pairs about what they could do on the larger grid, then take some suggestions. Some might want to colour all the dots
blue apart from the diagonal, others may want to recreate the 5 by 5 pattern many times on the larger grid, some may be more adventurous and would like to recreate the 5 by 5 pattern but rotate it as well. The idea here is to reassure the children that there isn't just one way to go about it but that there are many possibilities.
Either in pairs or individually, give children a copy of
this 25 by 25 grid and some coloured pencils/pens for them to extend their original pattern.
In a plenary you could select a few children to talk about how they have extended their pattern. The resulting images would make an attractive and mathematically rich display, particularly if accompanied by speech bubbles in which children described what they had done.
Key questions
How could you describe your pattern?
Tell me about what you're doing.
Possible extension
Challenge children to extend their pattern in a different way using the same starting pattern.
Possible support
When using the 25 by 25 grid sheets, some children might find it helpful to have a "window" made out of paper or card which isolates a 5 by 5 section of the grid (like the white box on the image in the problem).