Copyright © University of Cambridge. All rights reserved.
'Straight to Curves' printed from https://nrich.maths.org/
Show menu
Straight to Curves
For this activity, you'll need:
- A square piece of plain paper (side length of $15$-$20$cm would work well)
- Several sheets of differently coloured or patterned paper
- Scissors
- Glue
- Pencil
- Ruler
- A sheet of plain backing paper, larger than your square piece of paper
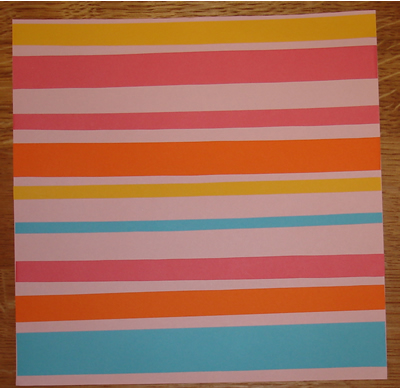
Cut three or four strips of paper from different sheets of the coloured or patterned paper. These strips should be the same length as the side of your square sheet of paper but they can be different widths.
Stick the strips onto the square of paper so that they are parallel to each other and parallel to the sides of the square, like this:
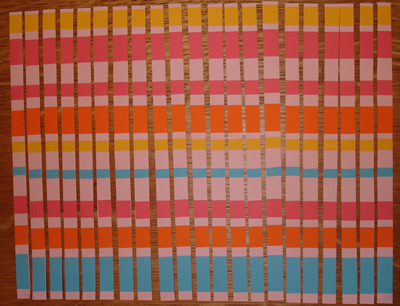
On the other side of the square piece of paper, mark out straight lines that are about $1$cm apart, parallel to each other and at right angles to the coloured strips.
Cut along these lines so that you are left with many strips of equal length and equal width, like these:
How could you make a curve using these straight strips of paper?
Experiment with the strips, laying them out on the sheet of backing paper. Stick them down when you are happy with your curve.
Could you make a different curve?
This activity is based on an idea in Mathematics Through Art and Design published by Collins Educational.
Why do this problem?
This activity encourages children to begin to talk about lines and transformations. This can be a good opportunity to introduce them to specific vocabulary in an exploratory environment.
Possible approach
You could have a square of your own prepared with the strips of paper already stuck on it. Begin by asking children to describe what they see, perhaps in pairs first. This gives you the chance to draw out some helpful vocabulary and, depending on the group's experience, you may want to introduce some new terms (such as horizontal, vertical, straight, sides ...).
At this point, you may want to give children the chance to stick strips on their own squares, perhaps working in pairs. (Make sure that these strips are stuck securely.) Then, using your own example, show them the lines you have drawn on the back and cut along them to make the final strips. Depending on the size of the square, you may want these strips to be more than 1cm in width. When they
have done this for themselves, bring them together again.
Encourage them to describe what they have now, once again drawing out appropriate vocabulary. This can lead into the challenge: can they arrange their strips to form a curve? You may want to spend a few minutes exploring what they understand by 'curve' - can they draw curve in the air? Can they draw a different curve in the air? And another different curve?
As pairs work together, observe what they are trying out and listen to their conversations. Before anyone glues any strips down, you could give chance for the whole group to walk around the room so that they can see everyone else's.
Key questions
What is a curve?
Tell me about the curves in your design.
How could you make a 'better' curve?
Possible extension
Encourage children to ask their own 'what if ...?' questions. If they find this difficult, you could suggest some yourself:
What if you start with a differently shaped piece of paper, for example a triangle?
What happens if you space the strips out differently?
What if the strips aren't all the same width?
What happens if the strips we stick on the square piece of paper are slanting?
Possible support
So that all children get the chance to explore the curve aspect of this task, you could have some squares of paper available at various stages of completion. Blu-Tak or something similar might be useful for temporarily fixing strips to the backing paper before gluing.