Copyright © University of Cambridge. All rights reserved.
'SHOO' printed from https://nrich.maths.org/
Show menu
[ You can buy a board and pieces to play this game for 2 (see address below). Instructions are also given for making your own game set. ]
Note: in what follows, when terms used in the game are first defined, they are in bold . Rather than set out the rules of Shoo baldly, in what follows we set out gameplay in the form of a narrative illustrated by photographs of actual game positions. So here is the 'Story of Shoo'.
THE BASIC GAME
The board, the pieces, winning
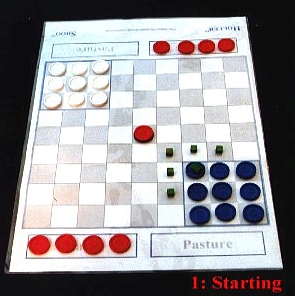
Shoo is a travelling game for 2 players. If you look at the first Photograph, which shows the game's starting position, you see 9 White pieces at the top of the board and 9 Blue pieces at the bottom. These pieces are the travellers .
(For the rest of these instructions we will suppose you are Blue; all the photographs are taken looking at the board from Blue's side. Note: in most of the photographs, marker beads are used to help explain positions and moves - for example the 5 small beads around Blue's travellers in this first photograph.)
You travel across the board in the area of 9 by 9 squares marked out in alternating white and grey like a chess board. This area is called the field. Within the field, the area of 9 squares, on the far side of the board, occupied at the start of the game by White's travellers, is your (Blue's) home area; it is marked out on the board by a thicker line. As Blue, you will win if all your travellers cross the field and fill up your home area on the far side before White fills up their home area on your side.
The other pieces in the Photograph are red: these are the horses. Horses are used by both players. If you look at Photograph 1, you can see that there are 4 horses on each player's side. These are in a special area off the field called the stable; 'stable' is printed on the board. Since each player has complete control of their own stable, they can choose when to move their horses out of their stable onto the field but, once on the field, control of a horse can be lost to the other player. Since a traveller mounted on a horse can do a lot more than a traveller on foot, control of horses is a key part of Shoo.
You will also see that, when the game begins, there is one horse in the middle of the field. What happens to this horse gets us to how the game starts.
Getting started
The players agree who will be Blue; being Blue gives no advantage. You now have to discover who chooses either to take the odd horse, making their number up to 5, or make the first move. To do this, Blue puts a coin under the last horse - unseen: White guesses 'heads' or 'tails'. If correct, White gets to choose between the extra horse and making the first move, otherwise Blue does. Note: having this choice has another purpose. If a player wins by only one move this is not to be seen as a draw. The choice at the beginning gives benefits to both players.
The basic moves
Travellers on foot , ie not mounted on a horse, can move one square at a time in any direction to an empty adjoining square - like a king in chess; in Photograph 1 the blue traveller, marked out with a green house, can move to any of the 5 squares marked with green beads.
A traveller mounted on a horse can move horizontally, vertically or diagonally along a line of squares as long as the squares are empty - like a queen in chess. Note: in Shoo, there is no jumping over other pieces.
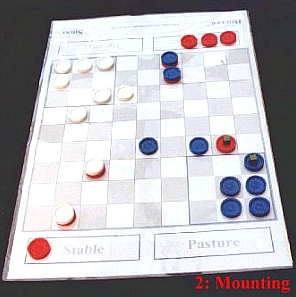
To travel mounted you do this. In one move you call up a horse into an empty square next to your traveller. This is illustrated in Photograph 2 - the horse and the traveller have beads on them as markers. This called-up horse is held by you for one move - imagine you have hold of its reins. This means your opponent cannot move it in their next move. You may want to emphasise that the horse is held by saying so, but you are not obliged to.
You call up a horse in one of two ways: i) from your own stable to any empty square on the field; or ii) by moving a free , ie unmounted, horse horizontally etc - as above. Note: in Photograph 2, the marked horse has been called up from Blue's stable - which has 1 horse left in it.
Then, you mount the horse in a second move by placing your traveller on top of the horse and, in the same move, riding it off as far as you want to go - legally. It may help to think of this move as mount & ride . In Photograph 2 you can see 4 horses are already mounted. Once you are mounted, you can stay on a horse for several moves, if you wish. Note: at the point when you first mount a horse you do not have to move it from the square on which you mounted it, if you do not wish to.
Finally, when you are ready, in a separate move, you dismount . You do this by leaving the horse where it is while placing your traveller in any empty adjoining square. Note: a dismounted horse is free and so can be moved by either player; so you need to plan how you dismount to avoid losing that horse. It's at this point that you are most likely to lose control of your horse to the other player.
So, to recap, you travel around the board in one of two ways. Firstly, as a foot traveller, one square at a time. Secondly, you can move mounted on a horse. Moving mounted has three elements: calling up and holding a horse next to you; mounting and riding - or just riding on, if already mounted; lastly, dismounting. Note: it is part of playing Shoo well to decide how quickly to bring you horses out from the stable at the beginning of the game. We suggest there is no hurry.
Moving free horses
Because of the importance of horses you are likely to move them so that you retain control of them. However, you can, as a separate move, move a free horse - legally, of course - to any empty square on the board. For instance, to get the horse out of your home area. This brings us to?

Really winning
Now that we have covered mounting & riding, we can describe how the game is really won. You do have to get your 9 travellers across the board into your home area first but also, to win, none of your travellers can be mounted. (Photograph 3 shows a board on which Blue has just won.) Setting out this rule also allows us to introduce the other area off the field, and next to the stable, the pasture .
The pasture, and retiring horses
In the Photographs you can see an area to the right of each player's stable, this is the pasture - 'pasture' is also printed on that area of the board; Blue's is at the bottom right. At the beginning of the game the pastures are empty.
You use the pasture as a place to which you can retire your horses. What you do is this. Before a horse is retired, it must be next to one of your travellers. If it is, as a separate move, you take the horse off the board and retire it to your pasture; in Photograph 3 there are 3 horses in Blue's pasture. Be aware, however, that, once a horse has been retired, as the name suggests, you cannot bring it back into play: equally, your opponent cannot gain control of it. Notes: i) since you cannot move a horse held by your opponent in their last move, you cannot - by the same token - retire that horse; ii) you can retire a horse from next to any of your travellers, it doesn't matter whether the traveller is mounted or on foot.
THE ADVANCED MOVES
The game, as described so far, is playable: but it does have drawbacks. The rest of this description says what those drawbacks are, and sets out the moves designed to overcome them. The first of these is the most critical.
Shooing
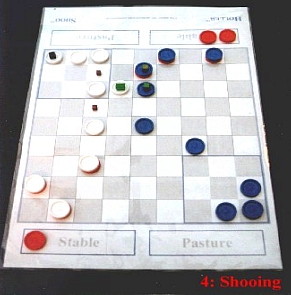
I am Blue. You can ensure the game cannot be won by leaving your (White) traveller, for example, in the back corner of my home area - this is the traveller in the top left hand corner of the field, marked with a black bead in Photograph 4. As the game stands, there is no way of getting White's traveller out of this corner. But, while the traveller remains there, I cannot win the game. So we invented the move called shooing, from which - of course - the game gets its name. Once we invented it, we saw it was a powerful move in all parts of the game.
Photograph 4 illustrates shooing. In the middle column of the board - towards the top - are two Blue travellers, one mounted and one on foot - marked with green beads. To the left of them is White's traveller, marked with a green house. The rule of shooing goes like this. If I make a move so that two of my pieces are touching any of your unmounted travellers, I can say, in the same move, that traveller - pointing to it - is shooed. You must then, in your next move, move that traveller; and you must move your traveller to a square where it isn't shooed. In Photograph 4, these are the squares marked with the small, purple beads.
Note: we say that two of my travellers may touch any of yours because, it may be that, after moving one of my travellers, I could shoo more than one of yours - this actually happens quite often. This is why I have to point to the exact traveller that I wish to shoo. Further, just as it is a rule (see above) that only an unmounted traveller can be shooed, equally you cannot get out of a shoo by 'capturing' a horse from a mounted opponent; capturing is described a little later on.
To recap: only foot travellers can be shooed; when shooed, you have to move to get out of the shoo; and, you can't do that by capturing a horse from your opponent. Shooing is needed to clear out the home area to which you are travelling but it can also be used to force a move at any point in the game.
Shooing Off
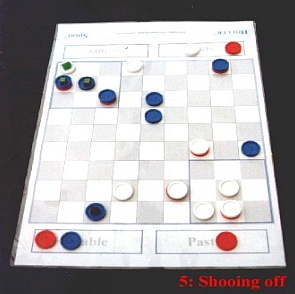
It may be the case that, when you have been shooed, there is no square to which you can move. This will happen when, in any empty square to which you could normally move, you are still shooed. When this happens you must take your traveller and put it in your stable. In effect, you have been sent back to the beginning again, and are said to be shooed off . In Photograph 5 the White traveller in the top left-hand corner of the field, and marked with the green house, is about to be shooed off by the two Blue travellers, one mounted and one on foot, on the row below, and marked with green beads. A piece that has been shooed off, and is waiting to return to the field, is said to be stabled. In Photograph 5, one White and one Blue traveller are still stabled - you can see them in the stables, each with one unused horse.
Returning to the field
After you have been shooed off by your opponent, you need to have a way of getting your traveller back into play. The way you return to the field is, as a separate move, to take your piece from the stable and put it in any vacant square in your first row, ie the one next to the stable. In Photograph 5 the Blue traveller, in the first row at bottom of the board, returned to the field in the previous move. Note: a stabled traveller has been stripped of all its powers: i) it cannot hold a horse that has been moved into the first row; and ii) it cannot, similarly, mount a horse already in that row. (This is why shooing off is to be avoided.)
Hushing
There is one last aspect of shooing with which we, now, need to deal. It may be that, by accident or design, you move your (foot) traveller into a position where it could be shooed. If you do this, and your opponent spots it, your opponent can say in their next move: that piece is hushed - 'Hush, you can't do that!?' When you have been hushed, you must move the piece back to where it was, and pick an alternate move. Note: you can only be hushed in the next move for purely practical reasons. It may well be that, later on, you have forgotten which square your traveller came from - or, it could be, that square is by then occupied.
We have, also, chosen to describe hushing after stabling - and returning to the field - for a particular reason. Supposing a Blue traveller is 'stabled', like the one in Photograph 5. White's travellers can then be positioned so that there is no way that Blue can return to the field without being 'hushed'. So Blue is blocked; 'though, at the cost, of course, of tying up a number of White's travellers.
Capturing
We said, above, that you could not get out of a shoo by capturing your opponent's horse. This section describes capturing - and also brings us towards the end of our story.
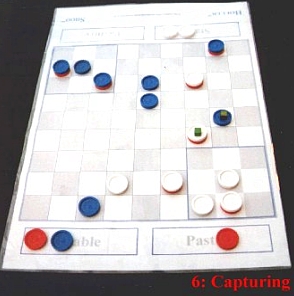
Capturing has been in the game from its very early stages. It offers the chance to capture, or threaten to capture, a horse on which your opponent is mounted - so altering the balance of the game to your advantage. A capture takes, in effect, two moves. In the first move you place one of your travellers next to one of your opponent's mounted travellers. This move threatens a capture. You then can make the capture, in a separate move, like this. As Blue, you take White's piece and put it into any empty square next to White's horse. You will then mount the now freed-up horse, riding away on it - as usual - if you wish to . Photograph 6 illustrates a threatened capture. In the photograph, the Blue traveller, marked with a bead, as before, is threatening to capture the horse mounted by the White traveller, also marked with a bead. Note: you may capture a horse from White even if you are mounted. The result will be, of course, that the horse you are riding will be left behind you, free. But this is a potential exchange you may want to make. And lastly...
Safe in your home area
The final drawback, in the basic game, we had to overcome is that, even when the game is apparently over, ie all the travellers are in or near their home area, it is possible for your opponent to counterattack. As Blue, you would turn back and mount a shooing attack on White's home area, clearing it out again. To avoid this endless to and fro, the last rule is the rule of safety . No piece in its home area can be shooed, or shooed off. But it is also part of the safety rule that, once in its home area, a traveller cannot leave its home area again. All this helps to ensure that games don't take too long, which leads to...
OTHER REMARKS
What can I do (and not do) in one move?
The general rule here is: If it's not forbidden, it's permitted . Here is an example of a valid 'multiple' move: you capture an opponent's horse, then ride away to a square from which, in the same move, you shoo your opponent. This said, there is the general restriction that: You can't get something for nothing . To illustrate: there is the rule (see dismounting above) that says you cannot hold onto a horse from which you have just dismounted. However you may still want to keep control of the now 'free' horse, ie by 'holding' it. To hold onto the horse in a later move, you must use up a move in the game - even if you do not physically move the horse itself. Note: in this case, you would show that you had made the move by specifically saying: 'This horse (pointing to it) is held'.
Length of play
We think that Shoo is less demanding than chess but more eventful than draughts (checkers). We, therefore, suggest that time limits are placed on gameplay. If you have a chess clock that could be used. The alternative is to use the rule (which we believe is part of Go) that no move may take more than a minute. If it does, the game is immediately forfeited.
Comments
The authors would be gratified to field questions and get comments and suggestions for improvement. Please contact David Andrew - 'dandrew@varials.swinternet.co.uk'. If you really get into Shoo and are not too far from Leeds or London, a visit to work through the game may be possible.
Variants
You may wish to try out the following variants: i) playing with 7 rather than 9 horses; ii) when a piece has been hushed, either that you lose the move altogether or (worse) that the piece that is hushed is shooed off - to the player's stable; and iii) you keep the rule of safety, that prevents travellers in their home area being shooed (off), but allow travellers to leave the home area again, taking the risk that they will subsequently be shooed off, of course. Or, there may be other variants that occur to you.
Game sets
A game set like that used in the photographs can be sent to you - for the cost of materials and postage. Please send £2 to: David Andrew, 54 Vesper Road, LEEDS, LS5 3NX. (If writing from outside the UK, email ahead to agree costs and method of payment.) You will be sent: i) the game layout printed on A3 paper; ii) an A3 laminating pouch - to protect the 'board'; iii) 10 pieces of each colour; and iv) a printout of this game description, including the photographs, in colour.
If you wish to actually laminate the game but haven't got access to an A3 laminator, you can use an iron. Although we have a laminator, the trick we used here is to iron hot, on steam, with a tea towel to prevent sticking. If you only iron the two ends you can hold the printout of the game firm inside the pouch but can still fold the pouch up. That's exactly what we did to the board used in the photographs.
Making your own game
In this section we give the specification of the game set we would supply so that you make your own version of it: we used a standard word processor. The board is printed on A3 paper. The field itself is 9 by 9 squares alternatively shaded and plain like a chess board. We use 31mm squares, which give sufficient margin to play with draughts pieces - 23mm in diameter. Next to both ends of the field you will need four squares for the stable and four for the pasture. Also mark off the home area of 3 by 3 squares in each corner. If you make the pieces out of card, it may help to distinguish the travellers from the horses if the travellers are round and the horses square.
Looking ahead: (re)inventing Holler?
Shoo was developed from a game idea originally called Holler - because, when you call up a horse, you 'Holler'. We think that Shoo is a great improvement on the original game but we also know, from practical experience, that Shoo is too demanding for primary school children. Over the summer, you may want to think about how Shoo could be simplified for primary school children. (Or you may want to try Shoo with younger children - and prove us wrong!) We plan, in September, to say something more about what you might want to have in mind when devising Holler; at the same time reacting to comment, queries, and criticisms, of Shoo.
And what about the design of Shoo?
The board and pieces you see in the photographs are the same as those we will supply at cost - see above. We are quite sure, however, that these could be improved. As a change from the kind of abstract thinking needed to play and, more so, comment on Shoo, you may want to think about how the design of both the board and the pieces could be improved. There are two general factors here. On the one hand the pieces, for example, could be made more interesting - perhaps easier to get hold of, like chess pieces; and different colours might liven up the game. On the other hand, there are the commercial considerations. The more complex the board design is, and the more tailored and detailed the pieces are, the more it will cost to make them. So a balance has to be struck. Within these broad constraints, if you do have design ideas, we would be very glad to learn of them.
Credits and copyright
This game design and description is copyright the authors; and Shoo and Holler are trademarks. The game was developed by Chris Kidd, Justin Kalef and David Andrew. For educational and personal use, game sets may be made up and these instructions copied freely; but please retain this copyright notice. Any commercial use of: the names Shoo, and Holler - for other games; and of the game concept and documentation is expressly forbidden without prior permission from the authors.